A wide range of manufacturing industries such as the automotive industry are supported by the outstanding capabilities of their manufacturing sites. The world’s attention is now focused on a future guided by the concepts of ‘Industry 4.0’ and ‘Smart Factory’ that aim at a radical shift toward an integrated factory automation and rationalization. The concept of Industry 4.0 was initially proposed in Germany but many countries such as Japan with an extremely high level of manufacturing capabilities have adopted its ideals early on. In those countries, manufacturers have quickly recognized the limitations of human operations and have worked tirelessly to automate their manufacturing sites.
On the factory floor, manufacturing is carried out through a series of processes: processing and machining, convey, assembly, and of course inspection. Processing and machining parts, conveying them across the factory floor and assembling parts into a finalized product are processes that have been automated at an early stage. Regarding the inspection process however, well into this 21st century, many factories solely rely on the human eye for inspection, because automated machines have been unable to match its capabilities. This trend is as pronounced as the size of the product is large, and this is especially true in the automotive or aeronautics industries.
Why are the dimensional and visual inspection processes not automated? This is because the human eye has unique capabilities that are hard to match: a high acquisition speed, a large field of view, a large dynamic range, a robust operation in various light environments and the possibility to detect features down to the 100 µm range. Although automated visual inspection has been massively introduced for the manufacturing of very small, low-profile parts like semiconductor chips, this is not the case for larger objects such as the many cast, forged and machined parts one finds in the engine or transmission of a car.
In order to implement a robust and automated inspection process on such manufactured parts, it is actually necessary to measure shape irregularities at high speed, with high accuracy, while being completely impervious to the ambient light of the factory floor. However, in-line measurement equipment with those high requirement has not been available until now, and the current situation is such that manufacturers still largely rely on the human eye. As a result, only about 20% of manufacturing sites rely on automated processes for the inspection of medium and large parts, which has led to major issues for manufacturers.
The Human-based Inspection, an Ongoing Crisis

There are specific reasons why manufacturers wish to steer away from human-based inspection and automate their inspection process.
First, human-based inspection lacks stability and reliability. A change in inspector can lead to a change in assessment, and for the same part and defect the same inspector can make different assessment at different times of the day or night, depending on his physical and mental conditions.
Second, the shortage of human resources is becoming a major issue, especially in rapidly aging countries and regions such as Europe, Japan, but also China. It is thus becoming more and more difficult to secure inspectors every year. Moreover, since inspectors are skilled technicians requiring special training, it is especially difficult to increase the number of inspectors and match demand, which induces significant hurdles at manufacturing sites.
Third, while there have been recent improvements in the automation of production and convey processes, manual inspectors remain a fixed cost for manufacturers. They require periodic training to ensure that the inspection level does not decline, which increases maintenance costs and puts a heavy burden on plant management. Fourth, with the evolution of CAD design and CNC production, the level of inspection requirement is getting higher and higher, and in an increasing number of cases, the level of inspection is exceeding the limits of the human eye.
Finally, the need to automate not only the inspection process, but also to integrate this automated inspection process to the manufacturing chain, is rapidly increasing. The Industry 4.0 initiative in Germany and Manufacturing 2025 in China have led to a global movement that all countries and manufacturers need to reckon with. Those who fail to take advantage of this major manufacturing revolution may well lose their competitive edge and face a major management crisis in the near future.
Why Can’t Manufacturers Automate their Inspection Process?
There are several obstacles to automating inspection. The first and foremost is the required inspection speed. On the manufacturing floor, many parts have a takt time of about one minute that puts a heavy burden on all manufacturing processes. To implement the inspection process, there are two ways the dimensions of a part can be inspected, with drastically different performance regarding speed: (i) contact inspection, in which a needle or other tool probes the workpiece, and (ii) non-contact inspection, in which lasers or other means are used to measure the part’s dimensions. While the contact inspection method has a wide range of applications, its measurement speed is typically limited. It is thus used for sampling inspection, but it is not suitable for a total inspection of all manufactured parts. This is where non-contact inspection comes into focus, a type of inspection that has been adopted for many small and high-precision parts, such as semiconductor chips.
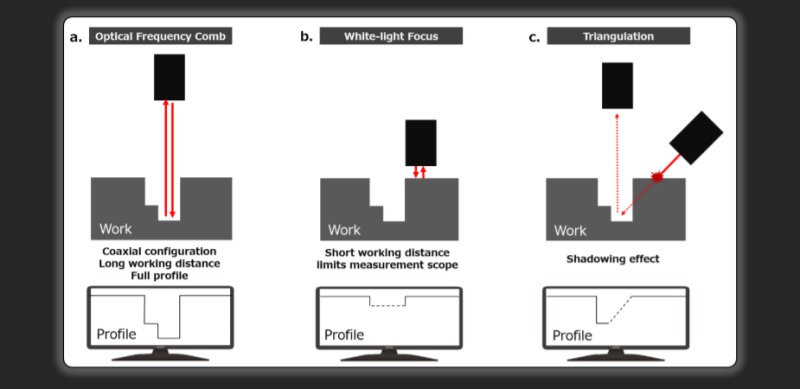
Conventional non-contact inspection methods that allow for defect detection typically include camera-based image processing as well as laser-based triangulation, but these methods cannot be applied to large, highly uneven parts such as the cast, forged and machined parts of a car. On one hand, optical cameras are affected by their light environment and it remains difficult to obtain three-dimensional data with such a method. On the other hand, triangulation suffers from shadowing effects when applied to uneven and complex structures due to the angle between its incident and reflective light. A more recently introduced method, the white-light focus or white-light interferometry scanning method, has a very short working distance and a very shallow depth of focus, which makes it unsuitable for inspection of large and medium parts with highly complex shapes. As a result, with existing technologies, the scope of inspection that can be automated is limited to small, flat parts, which greatly delays the automation of the inspection process.

Nobel Prize Technology – A Revolution in Automated Inspection
This is where a novel non-contact inspection method comes into play: the optical frequency comb, a concept that received the 2005 Nobel Prize in Physics. This method uses a unique laser that presents a coaxial configuration, meaning that both its incident and reflected light beams propagate along the same axis: as a result, this method is not hindered by shadowing effects. In addition, the coaxial configuration together with the long working distance of the optical frequency comb provides the full 3D profile of the most complex parts without limitations. Furthermore, the system is capable of acquiring up to 500,000 data points per second, which is drastically faster than other methods and is optimal for the rapid measurement of large parts.
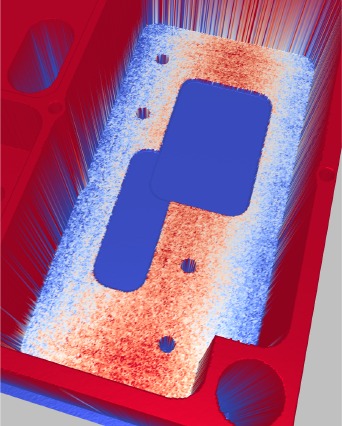
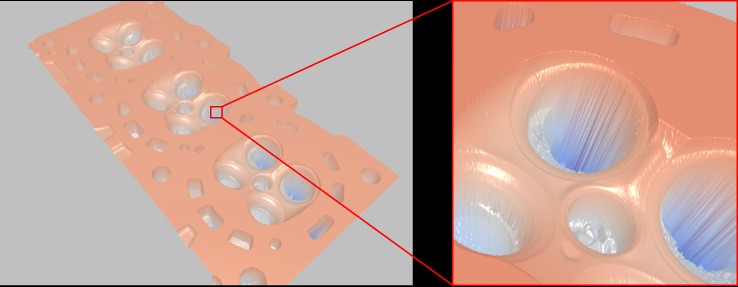
The interferential detection system of the optical frequency comb method prevents the system from being affected by ambient light, making it ideal for use on the manufacturing floor in any light environment. As shown above, this unique method gives access to the full 3D profile of highly complex parts such as cylinder heads, valve bodies, etc. where other methods fail.

The above is an extract from a white paper which can be downloaded in full here.
For more information: www.xtia.co.jp
Tags: 3d vina, hiệu chuẩn, hiệu chuẩn thiết bị, máy đo 2d, máy đo 3d, máy đo cmm, Quality 4.0 – The Growing Need for Fully Automated Inspection, sửa máy đo 2d, sửa máy đo 3d, sửa máy đo cmm
