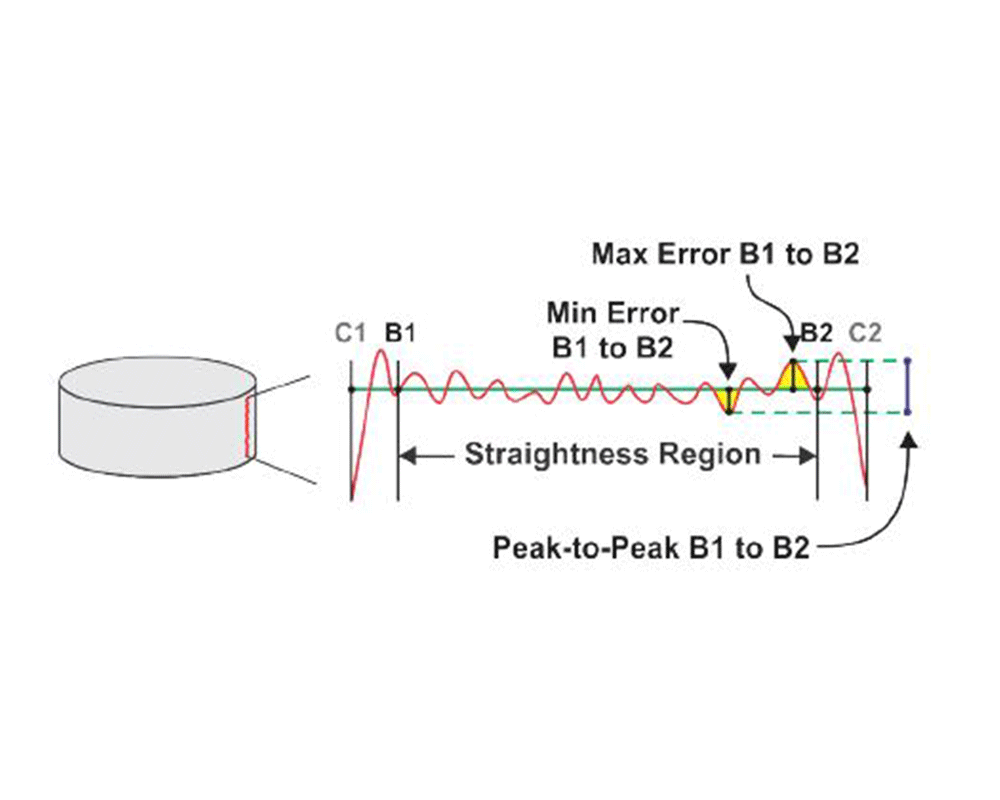
Adcole Material Build-Up & Advanced Straightness software is an advanced linear scan data analysis package. The software is used to detect any “material build-up” on the leading or trailing edge of the scan. Material build-up is usually found in a zone outside of the straightness calculation range.
Material Build-Up & Advanced Straightness software can measure one or more linear traces on a crankshaft journal, using assorted measurement methods. The basic method is to measure the journal from the lower radial cut to the upper radial cut. Alternatively, a different method is to measure the cheek positions of a journal and then take a linear measurement based on the actual length of the journal. Recently, Adcole developed a third option that uses alternative scan length measurements for material build-up and straightness. This feature enables users to set a scan length that is larger than the distance between the lower and upper radial cut positions. This capability provides an option to measure a larger percentage of the journal surface without the need of measuring the faces (thereby saving cycle time).
Industries
- Aerospace
- Automotive
- Heavy Diesel Equipment
- Industrial
- Locomotive Engine & Rail
- Marine
- Power Generation
- Pumps
- Robotics
- Small Engine & Appliances
- Transportation/Trucking
Compatible Gages
- 1100
- 1100-GX
- 1200-DH
- 1200-LX
- 1200-SH
Components It Measures
- Camshafts
- Crankshafts
Features It Measures
- Bearing Journal
- Crankgear
- Crankpin Journal
- Crank Pump
- Camshaft Journal
- Camshaft Lobe
- Face Perpendicularity
- Face Runout/Total Runout
- Journal Undercut Depth
- Journal Undercut Radius
- Post Slope
- Timing Flat
- Timing Notch
- Timing Pin
- Trigger Wheel Angles
Parameters It Measures
- Barreling
- Concavity
- Convexity
- Maximum Error per Region
- Minimum Error per Region
- Profile Error
- Straightness
Features & Benefits
- Enables organizations to find and act about material build-up found outside of the straightness calculation range
- Offers 3 different measuring methods to provide the most accurate, and specific measurement data available for material build-up and straightness
- Allows manufacturers to analyze linear scan data broken down into segmented regions — 3 or 5 regions
- Permits engineers to define the center region of a crankshaft and analyze it for straightness, concavity, and convexity
- Offers flexible measurement methods to drill down into the data to determine where material build-up is occurring, and its root cause
- Provides intuitive means to detect material build-up on the leading or trailing edge of the scan
- Affords the means to enable manufacturers to improve high value fabrication processes


Đánh giá
Chưa có đánh giá nào.