M62
Liên hệ
- Vận chuyển giao hàng toàn quốc
- Phương thức thanh toán linh hoạt
- Gọi ngay +84 978.190.642 để mua và đặt hàng nhanh chóng
MÔ TẢ SẢN PHẨM
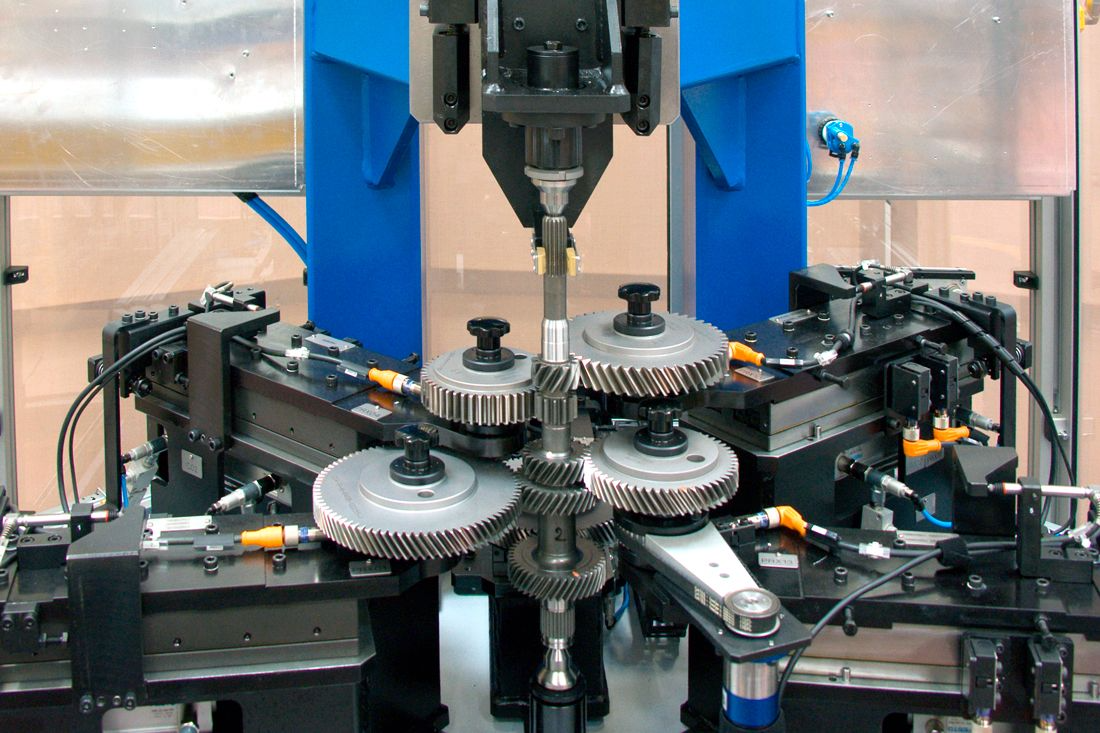
The M62 gear inspection line includes manual gauging instruments as well as automatic machines to match all the inspection requirements of the production process of a gear.
According to the specific operation along the process, Marposs can offer solutions to inspect:
- Dimensional parameters: OBD, Pitch Diameter, Root Diameter, OBR, ID, Distances, Parallelism and Perpendicularity between surfaces and shape errors
- Functional parameters: gear roller checks (Fi”, fi”, Fr”, Aa”, FTT, Nicks)
Depending on the gauge function, the measuring instrument is calibrated with artifacts (masters) that are of similar geometry to the production gears inspected, or full part like artifacts in the case of functional gauging.
Marposs can offer a complete series of masters manufactured in standard gauge steel (62-64 HRC) or high speed tool steel (HSS) and with surface treatment like TiN coating.
All master gears are provided with certification as per DIN 3961-3962 specifications.
All the M62 gauging systems can be connected to a wide range of Marposs innovative electronic interfaces and industrial computers. Through the dedicated Gear AddOn software, compatible with Microsoft Windows® and Marposs QuickSPC™, it is possible to perform accurate gear analysis with the support of Cartesian and Polar graphic elaborations.
Benefits
RANGE OF APPLICABILITY
Marposs products for gear inspection offer the possibility to check different types of individual or assembled gears:
- cylindrical gears
- spur gears
- helical gears
- shafts gears
- internal ring gears
VARIETY OF SOLUTIONS
The leading edge technology in design and engineering methods is applicable to manual gauges and fully automated systems using dedicated or retoolable solutions depending on the specific demands of the gear production process.
ACCURACY and CAPABILITY
Based on years of experience, Marposs has defined accurate standards for the metrological quality of their gear measuring instruments that today represent the state of the art for evaluation of gear components.
Version
M62 OBD (Over Ball Dimension) – Pinions/Ring Gears
A simple, compact bench system for OBD inspection on gears using calibrated ball contacts or pins with defined geometry. Suitable for even or odd tooth spur and helical gears and retoolable for different gear types within a defined range of variation.
Easily retooled by simple operations to replace contacts and/or centering nosepiece or adjusting axial length.
Versions are available for pinions, ring gears, as well as in versions for internal and external gears.
It can be connected to dial indicators, Quick Read and industrial computers.
Technical information:
- External diameter range: 15-100 mm and 25-180 mm
- Teeth module: 0.75 – 5.0
- Measuring force: adjustable from 4N to 20N depending on the part shape and type
M62 OBR (Over Ball Radius) – Pinions/Ring Gears
A simple, compact bench system for OBR inspection on gears using calibrated ball contacts or pins with defined geometry.
Easily retooled by simple operations to replace contacts and/or centering nosepiece.
Versions are available for pinions and ring gears.
It can be connected to dial indicators, Quick Read and industrial computers.
Technical information:
- Radius range: 15-100 mm (pinions) and 25-180 mm (ring gears)
- Teeth module: 0.75 – 5.0
- Measuring force: adjustable from 4N to 20N depending on the part shape and type
M62 OBD (Over Ball Dimension) – Gear Shafts
Gauge system for OBD inspection on shafts having one or multiple gear sections.
The shaft is held between precision centers and utilizes one or more measuring groups with calibrated ball contacts. The measuring groups are mounted on a rear slide and can be adjusted easily in heightalong the length of the shaft.
Available in vertical and horizontal configurations that can also be adapted with multiple-contacts turrets, low pressure measuring devices, additional runout checks and other.
It can be connected to dial indicators, Quick Read and industrial computers.
Technical information:
- External diameter range: 20 – 150 mm
- Teeth module: 0.75 – 5.0
- Shaft length: 150 – 450 mm
- Part weight: up to 10 kg
Measuring force: adjustable from 4N to 20N depending on the part shape and type
M62 OBR (Over Ball Radius) – Gear Shafts
Bench system for OBR inspection on shafts having one or multiple gear sections.
The shaft is held between precision centers and utilizes one or more measuring groups with calibrated ball contacts. The measuring groups are mounted on a rear slide and can be adjusted easily in heightalong the length of the shaft.
It can be connected to dial indicators, Quick Read and industrial computers.
Technical information:
- Radius range: 20 – 150 mm
- Teeth module: 0.75 – 5.0
- Shaft length: 150 – 450 mm
- Part weight: up to 10 kg
Measuring force: adjustable from 4N to 20N depending on the part shape and type
M62 OBD/OBR Turret Gauge
Bench system configured with multiple-contact turrets that can accommodate up to 12 different contacts. System is useful when necessary to meet the requirement of inspecting pitch, root or major diameters in addition to OBD. Each contact has a special shape (blade, shoe) properly designed according to the characteristics of the tooth.
Versions available for internal and external gears.
Technical information:
- External diameter range: 15-100 mm and 25-180 mm
- Teeth module: 0.75 – 5.0
- Measuring force: adjustable from 4N to 20N depending on the part shape and type
M62 DF (Double Flank) Gear Roller – Pinions/Ring Gears
Bench system suitable for dynamic inspection of gears with capacity to check traditional functional parameters related to double flank rolling action, i.e. Total Composite Variation (Fi”), Tooth-to-Tooth Composite Variation (fi”), Radial Runout (Fr”), Center Distance (Aa”) and identify the presence of irregularities such as Nicks. The gear under inspection is meshed with a gear rolling artifact (master) manufactured with a more stringent quality grade (3/4 gear grade) according to the ISO/DIN regulations.
Versions available in configurations with manual or motorized rotation and in versions for internal and external gears.
Technical information:
- Center distance: retoolable center distance from 25 mm to 200 mm
- Teeth module: 0.75 – 5.0
- Part weight: up to 10 kg
- Part height: up to 70 mm
- Measuring force: adjustable from 2N to 20N depending on the part shape and type
M62 DF (Double Flank) Gear Roller – Gear Shafts
Bench system suitable for dynamic inspection of gear shafts with capacity to check traditional functional parameters related to double flank rolling action, i.e. Total Composite Variation (Fi”), Tooth-to-Tooth Composite Variation (fi”), Radial Runout (Fr”), Center Distance (Aa”) and identify the presence of irregularities such as Nicks. The gear under inspection is meshed with a gear rolling artifact (master) manufactured with a more stringent quality grade (3/4 gear grade) according to the ISO/DIN regulations.
Versions available in configurations with manual or motorized rotation.
Technical information:
- Center distance: retoolable center distance from 25 mm to 200 mm
- Teeth module: 0.75 – 5.0
- Part weight: up to 10 kg
- Part length: 150 – 400 mm
- Measuring force: adjustable from 2N to 20N depending on the part shape and type
M62 DF/Lead Angle (Gimbal) Gear Roller
Semi-automatic system suitable for dynamic inspection of gears with capability to check, in addition to traditional functional parameters related to double flank rolling action (Fi”, fi”, Fr”, Nicks), lead angle, lead variation and tooth taper. These additional checks are performed with the integration of a second rolling master mounted on a floating fork and having gear sections located only at the far ends of the master so to concentrate the contact in points axially farthest apart, thus guaranteeing a more stable contact.
Technical information:
- Center distance: retoolable center distance from 25 mm to 200 mm
- Teeth module: 0.75 – 5.0
- Part weight: up to 10 kg
- Part height: up to 70 mm
- Measuring force: adjustable from 2N to 20N depending on the part shape and type
M62 SF (Single Flank) Gear Roller
Semi-automatic system suitable for dynamic inspection of gears with capacity to check the traditional functional parameters related to single flank rolling action, i.e. Single Flank Working Variation (Fi’), Single Flank Tooth-to-Tooth Working Variation (fi’), Short Wave Component in the Single Flank Working Variation (Fl’), Long Wave Component in the Single Flank Working Variation (Fk’).
The principle of gauging is assimilated to the real working condition of meshed gears, calculating the actual backlash and Transmission Error (T.E.), being then a qualified instrument for the noise analysis.
Applications
The Marposs Group continues to dedicate to its customers a combination of advanced products, technical know-how and commitment to the design, installation and support of the automatic assembly lines for automotive transmissions.
Typical verification requirements on an assembly line are: shims determination for components positioning, pre-load on differential housing and gearboxes, meshing stations, back-lash verification and a variety of dimensional and functional inspection on the single elements of the powertrain.
- Dual clutch transmissions (DCT) assembly line
- Manual transmissions assembly line (semi-automatic and automatic)
- Differential gear-unit assembly line (semi-automatic and automatic)
- Differential hypoid gear set semi-automatic assembly
- Differential side gears/pinions automatic assembly
- CVT assembly line
- Balance shaft cassette assembly line

Đánh giá
Chưa có đánh giá nào.