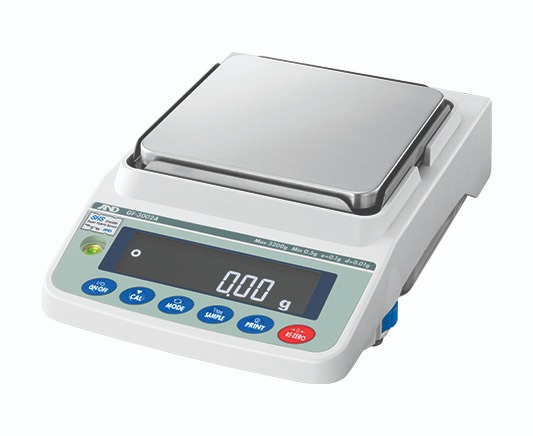
CÂN CHÍNH XÁC GF-10002A 10200G/0.01G
Liên hệ
- Vận chuyển giao hàng toàn quốc
- Phương thức thanh toán linh hoạt
- Gọi ngay +84 978.190.642 để mua và đặt hàng nhanh chóng
MÔ TẢ SẢN PHẨM
| Weighing capacity | 10200 g | |
| Minimum weighing value | 0.01 g | |
| Repeatability (standard deviation) | 0.02 g (for 10000 g) 0.01 g (for 5000 g) | |
| Linearity | ±0.03 g | |
| Stabilization time (when set to FAST under a good environment) | Approx. 1.5 sec (approx. 0.8 sec for 50 g) | |
| Sensitivity drift | ±2 ppm/°C (10 to 30 °C/50 to 86 °F, when automatic self-calibration is OFF) | |
| Accuracy immediately after internal calibration (for the GX-A series) | ±0.15 g (for 5000 g) | |
| Operating environment | 5 to 40 °C (41 to 104 °F), 85%RH or less (no condensation) | |
| Display refresh rate | 5 times/sec, 10 times/sec or 20 times/sec | |
| Units of measure | g (gram), oz (ounce), lb (pound), lb-oz (pound-ounce), ozt (troy ounce), ct (metric carat), mom (momme), dwt (pennyweight), gr (grain), pcs (counting mode), % (percent mode), SG (specific gravity), and a user-programmable unit. | |
| Counting mode | Minimum unit mass | 0.01 g |
| Number of samples | 5, 10, 25, 50 or 100 pieces | |
| Percent mode | Minimum 100% reference mass | 1.00 g |
| Minimum 100% display | 0.01%, 0.1% or 1% (depends on the reference mass stored) | |
| Communication interface | RS-232C and USB | |
| Applicable calibration weight value | 500g | |
| 1000g (1000 g interval) | ||
| 10000g | ||
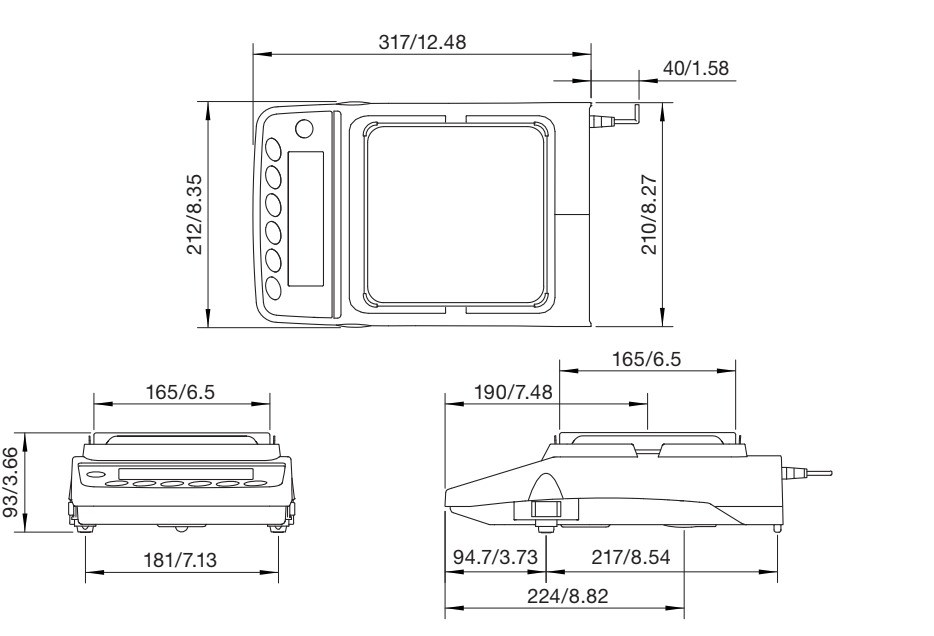
| Weighing pan size | 165 x 165 mm | |
| External dimensions | 212(W) × 317(D) × 93(H) mm | |
| Net weight | Approx. 5 kg | |
| Power supply / consumption | AC adapter / approx. 30 VA | |
Introducing The Next Generation Of Automated Weighing Applications
Today, it has become commonplace for materials to be weighed with automated devices. As precision balances are increasingly used in that way not just in production lines/systems but also in laboratories, users now face a range of unexpected problems.
Fact 1: Precision balances are designed to measure static loads only.
The weight sensor of a precision balance, regardless of its manufacturer, breaks in a short period if it is continuously affected by loads with acceleration (i.e. impact shocks). This typically occurs in factories where materials are placed roughly by machines or thrown by operators onto balances. In addition, impact shocks can easily shift values and cause errors.
The difficulty is that even if you know the above, you may not know what degree of impact shock is safe or unsafe for the balance to take necessary preventive measures such as refining the automatic loading mechanism.
Solution: Impact Shock Detection (ISD)
The GX-A/GF-A series visualizes the magnitudes of impact shocks that the weight sensor receives at four levels. It beeps once at Level 3 and twice at Level 4 (both of which should be avoided).

Cushioning under the weighing pan
The two leaf springs that support the weighing pan of the GX-A/GF-A series also mitigate impact shocks significantly.
Overload protection
The weight sensor is well protected against vertical and transverse static overloading. It won’t break due to malfunction of the weighing system’s actuator and the resulting excess load. A&D’s testing demonstrated that even a human did no damage to the balance by stepping on it.
Fact 2: Precision balances are intended to be used in a stable environment.
The performance (repeatability as well as display stability) of a precision balance is worsened by external disturbances such as drafts and vibrations, which is often the case in the field. Therefore, it is strongly recommended to evaluate whether the set-up conditions are appropriate. Checking repeatability, however, is cumbersome, especially once the balance is embedded in a system. Further, it is not uncommon that users don’t have an adequate test weight.
Solution: Auto Precision Assessment (APA)
The GX-A/GF-A series is designed with A&D’s latest technology, Electronically Controlled Load (ECL). This technology artificially generates a minute load (0.3 to 3% of the weighing capacity) by altering the equilibrium state of the weight sensor. ♦ After making a quick diagnosis of whether there is a critical failure, the balance indicates the standard deviation (i.e. repeatability) calculated from 10 repeated measurement with ECL on the spot. The entire process takes only 1.5 minutes.
Adjustable response characteristics
You can trade weighing speed for higher display stability*1 or vice versa by selecting one of three preset response characteristics (FAST, MID or SLOW).
Fact 3: Internal clocks of precision balances are never in complete sync with those of external devices.
This clock time disparity manifests as a problem most noticeably when you measure and record flow rates of pumps, feeders and other devices at short intervals*2 with a balance connected to a PC that performs the calculation. The timing at which the balance receives the command from the PC to send the weight value and its display refresh cycle gradually go out of alignment. In consequence, the PC intermittently produces irregular values (spikes when graphed) even if the actual flow rate is constant.

Solution: Flow Rate Display (FRD)
The GX-A/GF-A series can calculate and display/output the mass flow rate (the unit of measure can be selected from g/s, g/m or g/h), or the volume flow rate (mL/s, mL/m or mL/h) by entering the
density of the material. Up to 10 densities can be saved to the device. Both the display refresh rate and interval (set between 1 second and 1 hour) are regulated by the same internal clock of the
balance, making measurements free from the aforementioned problem.
Flow rate comparator
The indication allows you to monitor whether the flow rate is kept within the designated limits.The indication allows you to monitor whether the flow rate is kept within the designated limits.
Tare memory
The tare value can be saved in non-volatile memory so that the remaining amount of the material in thecontainer can be displayed again, even if power is disrupted for any reason during loss-in-weight measurement.
Minimum weight calculation based on the APA
From the standard deviation obtained using ECL described earlier, the GX-A/GF-A series also calculates and indicates the minimum weight at the installation location*5 in accordance with the
United States Pharmacopeia (USP) standard.
Minimum weight alert
To ensure that the measured sample quantity meets the minimum weight requirement, the GX-A/GF-A series can display an alert until the sample quantity reaches the value entered as the minimum weight.
User access control (UAC) and key lock for data integrity
Use of the balance can be password-protected for authorized individuals (up to 11 including one administrator)—the administrator can perform all operations including calibration while other users can make measurements only. Moreover, upon receiving a command to disable its keys, the balance becomes operable only by sending commands from an external device such as a PC.
Automatic self calibration (for the GX-A series)
The GX-A series can be set to calibrate itself automatically using its internal weight either (1) in response to change in ambient temperature (approx. 10 ̊C) to prevent error due to sensitivity drift, (2) at a set interval time, or (3) at predetermined (up to three) times of the day. Internal calibration can also be performed any time with one key press.
GLP/GMP/GCP/ISO compliant output
For documentation requirements, the GX-A/GF-A series can output its manufacturer, model, serial number, ID number, date + time, space for signature for calibration report, calibration test report, and title & end blocks for a series of weighing results.
Universal Flexi Coms (UFC)
UFC lets you edit serial data output/printout format. With this function, label printing is also made possible by connecting the balance to a commercially-available printer, and enabling arbitrary character strings output.
Gross/Net/Tare output
On receiving a command or with key operation, the GX-A/GF-A series outputs the gross, net, and tare values to an external device such as a printer, PC or PLC.
Statistical calculation function (SCF)
The GX-A/GF-A series can display and output statistical calculation data including number of data, sum, maximum, minimum, range (maximum-minimum), average, standard deviation, and coefficient of variation to facilitate the analysis of measurements.
Catalogue: GX-GF-A Series ENG




Đánh giá
Chưa có đánh giá nào.