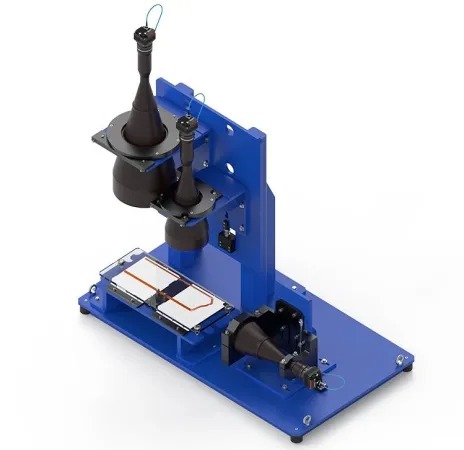
Marposs has announced a non-contact measuring system for performing dimensional verification of hairpins used in stator windings. Through optical inspection using three proprietary high-resolution cameras featuring telecentric optics, the system measures the head, tail, and roof of the hairpin with the goal of keeping lengths, widths and twisting under control. This helps to avoid problems during rotor assembly, avoiding damage to the insulation paper inside the rotor slots.
The increasing demand for compact and high-performance electric motors in the automotive industry creates the requirement of motors having both high specific energy and small overall dimensions. This problem has been solved by several car manufacturers, using stators incorporating hairpin windings.
One of the greatest manufacturing challenges is to produce single hairpins so that they can best fit the stator grooves. A major production problem is that the hairpin is inherently weak, being constructed from a thin copper bar, and is therefore easily deformed when measured with contact systems or using reference profile masks. The need to be able to measure the true shape of hairpins without distortion led to the development of a measuring system based on vision techniques.
 The Marposs HAIRPINFLASH is stated as the the ultimate solution for the non-contact evaluation of hairpins. This non-contact measurement system is capable of performing dimensional verification of the main geometric characteristics of the hairpin through only three generated images.
The 2D reconstruction of the complex shape of this inherently weak part, which is susceptible to easy deformation due to manipulation, is possible thanks to three proprietary high-resolution cameras equipped with telecentric optics appropriately oriented to frame the most important sections of the hairpin without any image distortion.
The acquired images are processed by a dedicated Marposs software developed specifically for carrying out measurements using 2D images or 3D point clouds.
Fast and Easy
All the operator has to do, is to place the hairpin into the measuring station onto tempered glass with reference points for pin placement. The system uses no containment jigs or other tools dedicated to the single part type: the entire measurement cycle is accomplished in only five seconds.
An intuitive operator interface with an inline synoptic panel provides immediate identification of nonconforming results, allowing the operator to backtrack to the bending machines.
The most important sections of the component (head, tail and roof) are measured with the aim of controlling lengths, widths and twists in order to avoid problems during the assembly of the stator, for example avoiding damage to the insulation paper inside the stator slots.
The analysis of the characteristic dimensions of the different types of hairpins provided the definition of an area framed by the cameras, which allows the measurement of all the hairpins belonging to a family of electric motors without the need to perform complex retooling or dedicated programming: simply select the appropriate hairpin type from the HMI list and start the process.
The system is for operation in the workshop or lab environment and provides the flexibility to measure a variety of parts. It can be provided as a manual-loaded test bench or designed for integration into an automated production line for 100% product inspection. Optional offerings to complement the optical hairpin inspection system include SPC software for statistic elaboration and data transfer, and a station for gaging the stripped area of the hairpin.
The HAIRPINFLASH provides accurate and quick measurement of different part types of hairpins alongside production lines with an immediate return in terms of inspection time. The bench design makes it virtually maintenance-free due to the absence of moving parts, flexible for a wide range of parts without the need for retooling, and easy to use even for low-skilled operators.
For more information: www.marposs.com
Tags: 3d vina, hiệu chuẩn, hiệu chuẩn thiết bị, máy đo 2d, máy đo 3d, máy đo cmm, Optical Measurement Systems For EV Stator Hairpins, sửa máy đo 2d, sửa máy đo 3d, sửa máy đo cmm
