To maximize efficiency and reduce fuel consumption, current combustor exit temperatures exceed the melting point temperatures of turbine blade materials. The external surfaces of the blades are protected by film cooling, a process in which cool air from the compressor is discharged via small holes in the turbine blade. Accurately produced cooling holes are essential to avoid turbine failure and ensure aircraft safe operation.
The small dimensions, narrow distribution, and diverse inclination angles of the blade cooling holes can make inspection challenging. Furthermore, cooling holes made with laser or electrical discharging machining methods can be an irregular shape. For functional reasons, they are often created at an angle to the surface or lie in a heavily-curved section of the turbine blade, making probe access difficult.
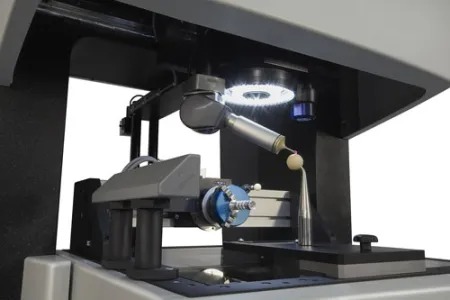
As well as overcoming these challenges, manufacturers can reduce measurement programming and cycle times by using metrology solutions that combine contact and non-contact sensors while optimizing workpiece and probe positioning. Hexagon Manufacturing Intelligence offers multisensor coordinate measuring machine (CMM) solutions that enable the precise 3D alignment of the turbine blade and the inspection of the location and size of the cooling holes in a single cycle.
Additional technology like rotary tables speed up the measurement process by automatically aligning the axis of each cooling hole parallel to the vertical axis of the CMM. Specialized blade software enables automated measurement paths to scan and evaluate blade profile characteristics like tangent line, leading and trailing edge, and profile thickness in a single procedure.
 With its multisensor concept, the Optiv Performance 663/664 Dual Z coordinate measuring machine integrates multiple measurement processes in a single machine and, due to the optional Optiv Dual Z and Optiv Dual Rotary options, features innovative technologies that ensure accessibility to a variety of different features in the overall measurement volume and their measurement in a single clamping.
Alignment with the HP-S-X1 Tactile Sensor
The coordinate alignment of the turbine blade occurs at its base, where corresponding control geometry elements are found. The required measurement points are recorded with the HP-S-X1 tactile sensor.
Multisensor Measurement of the Cooling Holes
First, the position and size of the hole are measured with the vision sensor. Its high-resolution camera and low-distortion precision optics guarantee maximum optical precision. A particular challenge is that cooling holes created with a laser or erosion process exhibit an irregular shape. For functional reasons, they are often created at an angle to the surface or lie in a heavily-curved section of the turbine blade. This causes the cooling holes to appear oval in shape during the optical measurement. The solution provided by the PC-DMIS CAD++ measurement software is a specialized image-processing algorithm that enables calculation of the center point of the hole based on a center-of-area calculation.
Using the Optiv Dual Rotary stacked rotary tables, the axis of the hole to be tested is aligned parallel to the sensor axis of the coordinate measuring machine. The shape and position of the hole are then determined through probing with the HP-S-X1 tactile sensor (ball-tip diameter in example: 130 μm) at defined depths.
Surface Scan with the Chromatic White-Light Sensor
The functionally relevant freeform surfaces of the turbine blade are digitalized using profile scans with the Chromatic White-Light Sensor (CWS) in the same clamping. This contactless point sensor enables fast and surface-independent 3D scans with a high point density. The surface data obtained is evaluated against the imported CAD data set in the PC-DMIS CAD++ measurement software.
For more information: www.hexagonmi.com
Tags: 3d vina, hiệu chuẩn, hiệu chuẩn thiết bị, máy đo 2d, máy đo 3d, máy đo cmm, Multisensor CMM Measures Complex Geometry Turbine Blades in a Single Setup, sửa máy đo 2d, sửa máy đo 3d, sửa máy đo cmm
