Though multi-sensor metrology offers unmatched speed and accuracy in manufacturing quality control, traditional coordinate measurement methods remain a staple of countless production operations. There are several explanations for such a paradox, not least because some businesses have simply never known any different – and why change something that’s generally served them fairly well?
In coordinate measurement the X, Y, and Z coordinates of an object are gathered by a probe and then analysed to paint a geometrical picture of that object. However, the technique is not suited to applications where the manufactured parts have recessed and hard-to-reach features, for example, or where the surface material is deformable. In such instances, alternative assessment methods are necessary – methods that are often manual, time-consuming and prone to human error.
With a variety of sensors for every scenario, that’s where multi-sensor metrology systems score a big win.
But what if you could have the best of both worlds in a single, state-of-the art unit?
With the FlexPoint multi-sensor measuring system from Optical Gaging Products (OGP), users can now have both.
Total Metrology Performance

OGP’s FlexPoint range represents a new generation of large format multi-sensor coordinate measuring systems, offering a unique blend of precision, flexibility and speed to solve a wide variety of dimensional measurement problems for large format parts.
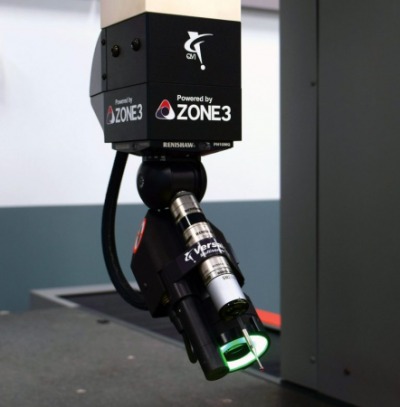
The machines support a range of tactile and non-contact sensors, point and line scan lasers, white light sensors and a unique video sensor, all powered by OGP’s advanced ZONE3 3D CAD-based metrology software.
The VersaFlex multi-sensor head offers up to three simultaneously available sensors on an articulating probe head, meaning there is no down time while individual sensors are exchanged from a change rack and no need to recalibrate each time a sensor is used.
Due to a stable transport design with carefully selected materials, rigid body members, air bearings on all axes and active temperature compensation, the FlexPoint is perfect for top-level performance on the production floor. Patented design features enable a larger measuring volume within a compact footprint, guaranteeing high-speed motion, thermal stability and vibration isolation.
Precise calibration capabilities reduce measurement uncertainty, with machine accuracy verification performed according to ISO 10360-2:2009.
For more information: www.ogpnet.com
Tags: 3d vina, hiệu chuẩn, hiệu chuẩn thiết bị, máy đo 2d, máy đo 3d, máy đo cmm, Multi-Sensor CMM Provides Total Metrology Performance, sửa máy đo 2d, sửa máy đo 3d, sửa máy đo cmm
