Author: Rohit Khanna President & CEO 3D Infotech
Most factories have inspectors checking parts visually to make sure there are no defects. This is typically a labor intensive, time consuming, and highly subjective task. Companies spend countless hours inspecting parts for scratches, dents, missing or misplaced components and other kinds of potential issues that may result in their customers rejecting their products. Many times, parts are shipped to customers in expensive packaging only to discover later that the customer will return them, without payment. If these parts can be repaired, then a significant investment is made to re-work the parts and then re-inspect them for outstanding issues. This can often be an iterative process. Whether you are an aircraft engine parts manufacturer detecting the smallest defects on airfoil blades or a medical device packaging for clean products, there is always room for error. There is a high degree of dependency in organizations to rely on human-driven, subjective decisions to pass or fail parts and assemblies for shipping or rework respectively.
 Interestingly, there has been a lot of talk around computer vision and using it for detecting such problems. For years, companies have deployed machine vision systems to check if a part is acceptable or not. These systems have provided tremendous capability in achieving more accurate results of typical visual inspections. With the emergence of artificial intelligence and deep learning algorithms, there has been a push to make this decision-making process completely autonomous, becoming easier to implement than a rules-based approach. Large organization have tried to develop their own software tools for making such subjective decisions, with a limited amount of success. The approach is to take a series of images of on a sample set of good and bad parts. One can call these test images, used for tagging pass or fail based on a subjective human decision. The machine learning software then builds a model for how the human would make such decisions on consecutive parts, in a way ‘auto-tagging’ them pass or fail. The test sample size can be increased, and the model can be applied to hundreds of such parts and the results can be analyzed to determine the accuracy of the computer’s ability to make these decisions. If there is a discrepancy, then the decision-making policy can be refined by offering more detailed guidance through marking to finalize the machine learning model. Once a stable model has been developed, then the system is ready to be deployed to thousands or millions of parts for inspection.
During Covid-19, companies have had to reduce their workforce either through lay-offs or by means of safe-distancing them. One can no longer have a line of inspectors working very close to each other. Many of the workers have been infected with the Coronavirus or are on leave. Some are simply working from home can monitor results remotely. In such circumstances, the need for such smart factory solutions utilizing computer vision and artificial intelligence is more than it has ever been. With the desire to automate and autonomize operations, organizations have leaned on solution providers to deliver both 2D and 3D machine vision solutions, robotic and non-robotic to help make better decisions on their parts, faster, more repeatably and with fewer workers. This is a natural progression that has been taking place for decades already in the office and the shop-floor, but Covid-19 has accelerated the process to help such companies reduce costs, while increasing productivity and reliability.
Let us take a look at an example of a coating company that users inspectors to ‘look at’ parts manually. They have six such operators that look at coatings on their metallic parts. Sometimes they can spot some inconsistencies like pits or positives. Often there are scratches. The more defects there are on the part, the more time an operator spends to inspect it and document the reasons for the rejection of the part. Not only can machine vision identify defects, but can also classify them and report the results in a very traceable way. This workflow may even include OCR to tie the results to the serial number printed on the blade.

Images of part samples showing surface quality. Defects are highlighted in red.
A perfect part typically takes only a few minutes to inspect and an imperfect one can take as long as thirty minutes. Since there are thousands of parts that need to be inspected each day, six operators are required to be on the shop-floor, inspecting parts in two shifts. This costs the company over $120,000 per month (or $1.44 million per year) in labor costs. If we suggested that it takes about 10 mins on average per part to be inspected, we would get a yield of approximately 500 parts per day, or about 2,000 parts per month. With the implementation of computer vision technology, aided by deep learning algorithms for decision making, such a company can realize a gain on many fronts. Such a system only takes 100 milliseconds to capture and process the data. If allow 3 seconds per part for inspection, we can estimate that the entire batch of parts can be inspected in about 2 minutes per part, including loading and unloading of parts. The throughput improvement would be five times greater using the new system, resulting in 500 parts per day, with one operator loading and unloading one station, freeing up the other labor resources to tackle different problems in the factory.

A score is assigned to each image and used to determine whether it is below or above the threshold that is considered pass or fail. The threshold is automatically determined and can also be improved with human interaction as necessary.
Another way to look at this would through the lens of pure cost reduction. In our example, the company was spending approximately $7,200 per day to inspect 500 parts. Now, with an investment in the system and the cost of one operator for one year combined being at approximately $200,000, there is a significant cost-savings in the entire operation. Not only is there a direct cost savings, but the impact on customer satisfaction and reduced rate of returns from unhappy customers is immeasurable. Many times, parts were considered passing but in fact had some defects and got shipped to customers. This resulted in a significant amount of returns and potential loss of business from some unhappy customers.
This example highlights many benefits of implementing a level of automation using computer vision with a high degree of intelligence. Lower costs, more reliability in inspections, better documentation, consistency in acceptance and rejection and generally removing the subjectivity created by humans is something worth implementing. 3D infotech is proud to introduce this technology to all types of industries that can benefit from the new era in visual inspection.
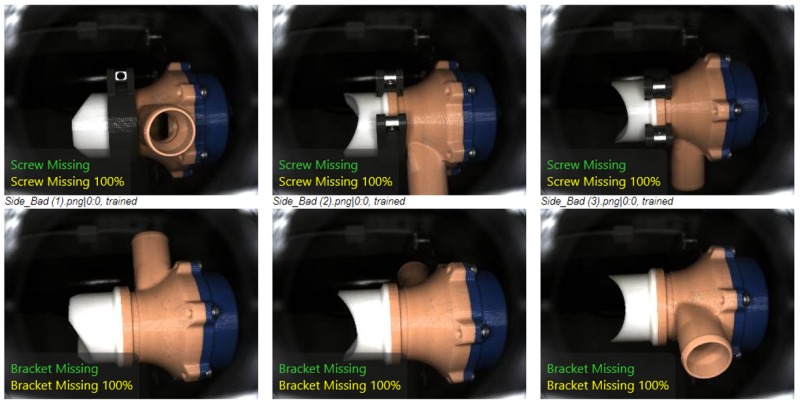
 Above is an assembly verification example. In some cases, you can see that there is a missing screw or brackets. The part has been viewed at various angles, resulting in a complete 3D visual inspection.
3D Infotech has over 15 years of software development and deployment experience in the metrology industry dedicated to providing solutions for manufacturing companies in Aerospace, Automotive, and Consumer Electronics industries.
Tags: 3d vina, Entering a New Era in Visual Inspection, hiệu chuẩn, hiệu chuẩn thiết bị, máy đo 2d, máy đo 3d, máy đo cmm, sửa máy đo 2d, sửa máy đo 3d, sửa máy đo cmm
