In the past, measurement service provider Lometec had ‘merely’ conducted some workpiece first-sampling for one of its customers, a well-known medium-sized plastics processor. But when an urgently needed, brand-new tool suddenly failed, the metrologists moved out on a special mission: Delivering overnight service, they digitalized the mold tools using GOM scanning systems so that precise, rapid reworking was possible. The impending default on delivery was averted.
Lometec’s customer produces, among other things, thermoplastic weather-proof housings designed for use in extreme climates. When the quantities in demand began exceeding the existing tool’s capacities, the company commissioned construction of a second, identical tool—and that’s where the trouble began.
Tool Failure Ater Passing First Sampling
At first, everything was looking hunky-dory: The new tool was delivered and worked just fine, as verified by Lometec as part of first sampling of the housing. The 3D measurement service sampled 125 parts and recorded the results in the initial sample test report (ISTR). Process capability was validated and the plastics processor was able to produce with two tools at once, doubling output as desired.
But shortly after starting mass production with the second tool, it proved prone to faults: Sliders and inserts began seizing. The tool manufacturer responded promptly to the complaints and supplied spare parts—but these did not match precisely, making it impossible to simply exchange them, never mind swapping over the sliders and inserts between the two tools.
The solution: Scan and Rework – ASAP
 This gave the plastics processor the idea to have Lometec digitalize and measure the 14 affected mold inserts and sliders. The measuring data would then be used to rework the imprecise spare parts.
Lometec’s managing director Jörg Werkmeister remembers: “Our job was to compare the old inserts with the new ones and return all of the inserts to the company again as quickly as possible, so they’d be able to keep on producing with one tool at least. Having both tools measured was naturally stopping production completely.”
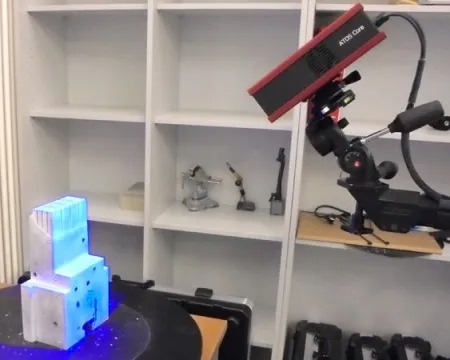
No sooner said than done: Themselves specialists for rapid optical 3D measurement, Lometec was confident they had what it took. The measurement service maintains two fully climatized measuring rooms and uses measuring equipment by renowned German manufacturers, including three GOM systems for full-field digitalization of technical mold halves. “We set up the 3D scanning lab completely from scratch in 2016, it’s absolutely state-of-the-art,” Jörg Werkmeister says. “Our trio of ATOS Triple Scan, ATOS Core and ATOS ScanPort means we’re excellently equipped for a diverse range of digitalization jobs.” Investing in GOM technology had been very good decision, Werkmeister goes on to say. “The measuring data the systems supply are outstanding.” To meet the demand for promptness, two metrologists tackled the plastics processor’s job in tandem: One working with ATOS Triple Scan, the other with ATOS Core.
Before conducting the measurements, the metrologists cleaned the sliders and inserts, removing residues such as grease and the like. Next, they applied high-precision reference point markers. These ensure that the software joins the separate scanned images correctly. “For digitalization, we chose really small increments,” Jörg Werkmeister tells us. This achieved high detail resolution.
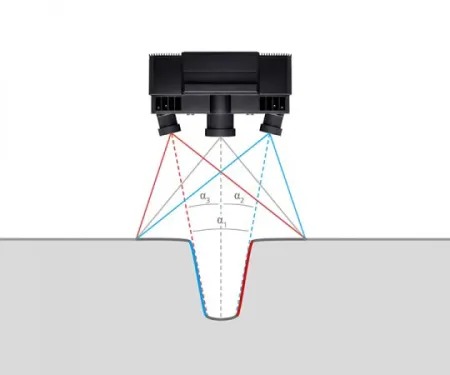
 Triple Scan Principle
Both of the GOM 3D scanners used work with the Triple Scan Principle: Fringe patterns are projected onto the surface of the object and are captured by two cameras based on the stereo camera principle. As the beam paths of both cameras and the projector are calibrated in advance, 3D surface points from three different ray intersections can be calculated. The result is complete measuring data without holes or erratic points. The systems are mobile and can be employed easily even outside of the measuring room, e.g., on site in the customer’s production facilities.
The Measurement Detects Differences
What did the measurements say? Jörg Werkmeister summarizes: “The GOM software used the measuring data from first tool’s sliders and inserts to generate a 3D point cloud. We uploaded this to GOM Inspect Professional as a reference. We then took the second tool’s 3D slider and insert data and compared the two sets actual-to-actual. The direct comparison highlighted the differences between the two tools really clearly.” Using the supplied measurement logs and the corresponding STL data made it possible to modify the mold inserts and allow them to be exchanged.
Jörg Werkmeister is pleased with the successful project—and with his team’s dedicated work: “Our rapid response allowed our customer to meet their delivery deadlines as planned.” He winks as he adds: “I’ll wager that the company will be looking more closely the next time they commission a new tool.”
For more information: www.gom.com
Tags: 3D Scanning Prevents Production Downtime, 3d vina, hiệu chuẩn, hiệu chuẩn thiết bị, máy đo 2d, máy đo 3d, máy đo cmm, sửa máy đo 2d, sửa máy đo 3d, sửa máy đo cmm
